Class 2 - 3500 GTW
Class 2.5 - 4,000 GTW
Class 3 - 10,000 WD/6,000 GTW
Class 4 - 12,000 WD/8,000 GTW
Class 5 - 14,000 WD/10,000 GTW
Trailer Towing Tips
Hitches are available from a variety of aftermarket suppliers for a wide range of domestic and import vehicles. Thanks to innovative designs that are engineered to fit specific vehicle applications, most hitches can be easily installed with no drilling, welding or other modifications. Wiring kits also help simplify connecting trailer lights and electric braking systems to the vehicle’s electrical system. On many applications, a hitch can be installed in 30 minutes or less, including the wiring connections. There are exceptions, especially for custom type installations, or other special needs. If you feel challenged with resources or just don't have the time there are dealers that can do the installation for you, normally in a day. Selecting the right hitch for a particular application is the key here, which requires an understanding of the various hitch class ratings and talking with your dealer. When choosing a hitch, consider not only your current towing needs, but also any future needs that may arise. If your are towing a rowboat today, you may trade for a bass boat next year. If in doubt, its always best to upgrade to a higher class. For most full-size trucks and SUVs, this would mean installing a Class 3 or 4 hitch rather than a Class 1 or 2 hitch.
Gross Trailer Weight (GTW)This is a combination of the weight of the trailer and cargo inside. This is the total weight of both elements. Never exceed the weight capacity (GTW) of your trailer hitch. The weight rating of trailer hitches, receivers, ball mounts, balls, and safety chains (or any other piece of the towing system) must not be exceeded by gross trailer weight or tongue weight. Selecting the Proper Hitch is a MUST for Safe, Trouble-Free Towing
Tongue Weight (TW) - the downward pressure placed on the hitch ball by the coupler. Tongue weight will vary depending on where the load is positioned in relationship to the trailer axle(s). To measure the tongue weight, use either a commercial scale or a bathroom scale with the coupler at towing height. When using a bathroom scale with heavier tongue weights, use the method shown; multiplying (the scale reading x 3) or heavier tongue weights, use the method diagrammed on the right.A Receiver Hitch is the primary device that is attached to the rear of the vehicle that allows you to tow. There are six classes of hitches. It is very important to choose the correct class of receiver hitch. Gross trailer weight and tongue weight will determine the hitch that is needed. Do not exceed the lowest rating of any component of your towing system.
Class 1 - 1000 to 2500 GTW
Class 2 - 3500 GTW
Class 2.5 - 4,000 GTW
Class 3 - 10,000 WD/6,000 GTW
Class 4 - 12,000 WD/8,000 GTW
Class 5 - 14,000 WD/10,000 GTW
Class 1 hitches can handle a gross trailer weight (GTW) of up to 2,000 lbs., and a maximum tongue weight of 200 lbs. The hitch may be a simple draw bar- or step bumper-type of hitch. Other hitches may have a crossbar with a small one-inch or 1-1/2-inch square receiver, or a small 2-inch by 5/8-inch receiver. This type of hitch is often used on smaller cars, mini-pickups and mini vans for bike racks and light-duty towing.
Class 2 hitches are for loads of up to 3,500 lbs. GTW and 300 lbs. tongue weight, such as a small boat trailer, snowmobile trailer, motorcycle trailer or camper. Typical installation applications include large rear-wheel drive cars, full-size vans, pickups and SUVs.
Class 3 hitches can handle up to 5,000 lbs. GTW and 500 lbs. tongue weight. This type of hitch generally has a 2-inch rectangular receiver and is considered the "standard" type of hitch for general towing. You will see more of this class on the road, in cars, pickup trucks and vans. This is used for ATV (snowmobile, smaller boats, etc.), small to mid sized travel trailers and general utility trailers, both single and tandem axle, with and without brakes. (Certain states require brakes on trailers with 3500 Gross Weight, or higher).
Class 4 hitches are for up to 10,000 lbs. GTW and 1,000 to 1,200 lbs. of tongue weight. This type of hitch is usually a weight-distributing type of hitch.
Class 5 hitches are for extra heavy loads greater than 10,000 lbs. GTW and more than 1,200 lbs. tongue weight. This type of hitch may have up to a 2-1/2 inch receiver with a 3/4-inch pinhole. Typical uses might be to tow a car trailer, horse trailer or unusually large boat or camper.
For really heavy towing, there are also Fifth Wheel and Gooseneck hitches that mount in the bed of pickup truck.
Your towing system's maximum weight rating is always equal to the lowest rated item in the system. Your hitching system cannot be upgraded to a rating higher than the maximum rating of your hitch. For example: a 3,500 lbs. ball on a 2,000 lbs. max trailer weight rated hitch does not increase your towing capacity to 3,500 lbs. Your hitching system is still rated at 2,000 lbs. Conversely, a 2,000 lbs. ball on a 3,500 lbs. max trailer weight rated hitch decreases your maximum towing capacity to 2,000 lbs. What’s important here is to use a hitch that is strong enough to handle the maximum anticipated total weight of the trailer, but does not exceed the towing capacity of the vehicle. Refer to the vehicle owner’s manual for maximum towing and tongue weight limitations. Also, the trailer tongue load should be kept at 10 percent of the loaded trailer weight for weight-carrying (deadweight) hitches, and 12 percent for weight- distributing (equalizing) hitches.
Once you’ve figured out which class of hitch best suits your towing needs, you also need to consider any other suspension or vehicle modifications that might be beneficial. These modifications may include stiffer springs, air springs, overload or air assist shocks, larger sway bars or even an after market ATF cooler to protect the automatic transmission from overheating. Such modifications may be needed on vehicles that will be used for heavy towing and will be equipped with a Class 3, 4, or 5 hitch. Another add-on that improves rear visibility when pulling a large trailer is extended side-mount mirrors. As for installation, make sure the hitch clears all suspension components, the spare tire (if hung underneath) and the tail pipe, and is securely mounted. Follow the hitch supplier's installation instructions and use the fasteners that are provided. As mentioned above a dealer can perform the installation as well.
Ball Mount
The ball mount is placed inside the hitch opening which is mounted to the vehicle (sometimes called a "stinger").
The mount is secured with a "pin" that goes through both the coupler and receiver.
For Class 2 and 3 it's normally a 5/8" solid pin. There is also a secondary secure device; a "clip" that goes through the pin itself.
It is critically important this clip is used. Otherwise, the pin would eventually slip out; thus, loosing your trailer connection to the two vehicle.
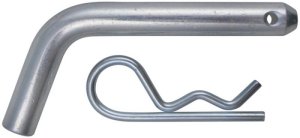
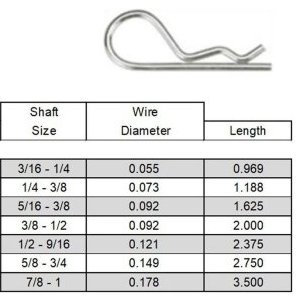
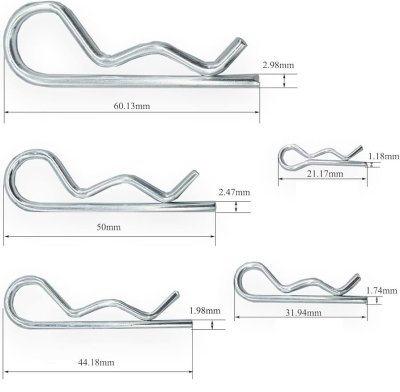
Other than the common 5/8" there are other sizes to work with various sizes of the main pin.
| Needed Information for Correct Ball |
|
 The Hitch Ball is the connection from the hitch to the trailer. There are many elements in determining the correct hitch ball.
Mounting platform thickness, hole size, coupler socket size and the most important, gross trailer weight rating. In addition there's
The Hitch Ball is the connection from the hitch to the trailer. There are many elements in determining the correct hitch ball.
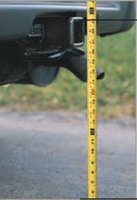
Mounting platform thickness, hole size, coupler socket size and the most important, gross trailer weight rating. In addition there's Ball Height A final step is to figure out the proper ball height for your trailer. First, measure the distance from the ground to the towing vehicle's hitch (receiver)
top part.
Then level the trailer, and measure from the ground to the bottom of the ball coupling on the trailer.
Use these measurements to determine how much drop or rise is needed in the ball mount or receiver so the trailer will be level.
Therefore, measure the height from the ground to the tow vehicle's receiver top, then the height from the ground to the bottom of the trailer's coupler.
If they are the same you are good to go. If they are different rise or lower the ball mount as needed.
For example, if the receiver is 15" and the trailer coupler is 11" you will need a ball mount with a 4" drop.
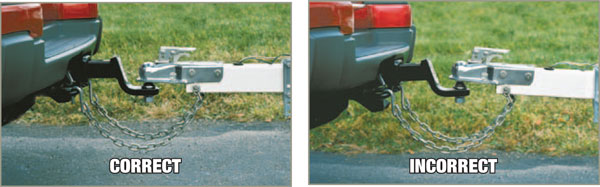
The idea is to tower the trailer level. The middle image shows a (different situation) ball mount with a 2" drop
while the right image shows an example of a wrong ball mount selected. Here's a simplified diagram the Author wrote showing the same idea. Shown; the measurements are the same therefore, using a "straight" ball mount
(no rise or drop). Coupler. Sway Trailer Loading Sway Controls
The Friction Sway Control does exactly what its name implies, it uses friction to resist pivotal movement and thereby works against the effects of induced sway.
It operates on the principle of "stiffening" the coupling between the tow vehicle and trailer.
The degree of "stiffening" or friction is adjusted to suit various trailer weights and towing conditions.
Its operation is simple and uncomplicated. It doesn't prevent the generation of sway; it simply works to resist the forces once they have started.
Dual Cam Sway Control
Dual Cam Sway Control There are basically two types of hitches: weight-carrying ("deadweight") and weight-distributing ("equalizing").
Weight-carrying hitches are generally, but not always, for smaller, lighter loads.
Weight Distribution


The coupler is the component that is placed over the hitch ball that connects the vehicle to the trailer.
Be sure that the coupler size matches the size of the hitch ball and that the coupler handle is securely fastened.
The inside of the coupler should be clean and slightly lubricated.
To determine what size hitch ball you need for your application you will need to know the size of coupler that is on the trailer.
Trailer Sway can lead to a loss of vehicle control. When starting out with a new load on a trailer, make sure it will not sway by gradually increasing your
speed in intervals until highway speed is reached.
If the trailer does begin to sway, try adjusting the cargo and equipment accordingly and then repeat the test.
If repositioning the load and equipment did not help reduce the sway, a sway control may be needed.
One of the main causes of trailer sway is not saving a large enough percentage of trailer tongue weight compared to gross trailer
weight.
Usually tongue weight is 10 to 15 percent of the trailer's gross weight.
To help prevent the trailer from swaying back and forth, a few things can be done.
Try placing heavier cargo in the front of the trailer, ahead of the trailer's axle.
Also center the cargo left-to-right and use tie-downs to keep the load from sliding.
Available in two different styles, sway controls reduce the effects of wind gusts and sudden maneuvering by applying resistance to the trailer and vehicle with
respect to each other.
Aside for trailers with a large surface area, such as enclosed or travel trailers, sway controls are also used on trailers with a low tongue weight percentage.
This works along with a weight distribution hitch. Do not use this on a class 1 or 2 hitch or with surge brakes.
Many factors can contribute to trailer sway - the design of the trailer, the suspension, tire inflation pressures, configuration of the tow vehicle, towing
speeds and hitch weight.
(for use with weight distributing equipment)
Unlike the friction sway control, this approach works to control sway from the start rather than just resisting sway once it's begun.
And it works only when needed.
When towing in a straight line, the cams on either side of the trailer A-frame are locked in position.
This essentially creates a "rigid" connection between tow vehicle and trailer and minimizes the effects of induced sway caused by high cross-winds or passing
vehicles. Usually the cams ride in a detent, locked-in position, even on fairly sharp curves.
However, when cornering maneuvers are required, the cams automatically slide out of their detent to permit full radius turns. Yet when the maneuver is short and abrupt,
like that encountered in the event of a sudden swerve or a wheel dropping off the road, the cams seek a straight-line towing angle that helps the tow vehicle retain control.
The advantage of the dual cam system is its ability to forestall sway in addition to sway resistance. It works to hold down the start of swaying activity while at the same
time allowing free and easy vehicle and trailer interaction. Another advantage of the dual cam system is that it's installed on the trailer and therefore doesn't require
adjustment every time the towing vehicle and trailer are hooked up, unless hitch weight or tow vehicle loading are changed.
Weight Distribution Systems are usually recommended for vehicles towing more than 5,000 lbs.
The systems improve braking and handling while increasing the towing capacity of some trailer hitches.
This system is composed of four major elements:
 the hitch receiver,
the ball mount,
the spring bar assembly and,
the sway control
These components work in unison to provide complete towing system compatibility.
Safety Chains
Safety chains are a requirement and should be crossed under the tongue of the trailer so that the tongue will not drop to the road if it becomes separated from
the hitch.
The safety chains should only be long enough to allow for tight turns.
Anything longer may weaken the safety feature of the chains if the other connections fail.
Also make sure the chains cannot wiggle or bounce free and do not let them drag on the ground. Never attach the safety chains to the bumper.
Trailer Classification: Safety Chain Breaking Force-Minimum
Class 1: 2000 lbs (8.9 kN)
Class 2: 3500 lbs (15.6 kN)
Class 3: 5000 lbs (22.2 kN)
Class 4: The strength rating of each length of safety chain or its equivalent and its attachments shall be equal to or exceed in minimum breaking force the
GVWR of the trailer.
Trailer Tires
Check tire inflation and tread wear often.
Fill the tires to match manufacturer's guidelines, for tires with too much or too little air pressure can cause the trailer to sway.
Electric Trailer Brake Controls
For use with trailers that have electric brakes, electric brake controllers send the signal that applies the trailer's brakes.
Transmission Coolers
A must for all towing vehicles with automatic
transmissions. Transmission coolers lower the operating temperature of the oil by up to 60 degrees.
Every 20 degree drop in temperature can double both oil and equipment life by reducing deposits and stress on the seals.
Overheating causes 90% of automatic transmission failures.
Trailer Wiring
Trailer Towing Mirrors
Always make sure the turn signals, brake lights, tail lights, electric brakes, and breakaway switches are working on the trailer prior to each use.
If the trailer has some wiring problems, a wiring diagram is available which shows the
proper way install trailer wiring.
Replacement are also available. Always be sure to find a good secure ground on the trailer and also on the tow vehicle.
If the vehicle still needs to be wired, and you don't have the time, a competent dealer can perform this job.
Basic 2 and 3 Wire Systems
2 Wire System are vehicles that have the turn signal and brake lights operating on the same bulb and wire. Up to 7.5 amps per circuit (per SAE specifications).
It will have an electrical code of "A" in the paper catalog.
3 Wire System are vehicles that have the turn signal and brake light use different bulbs and wires. Up to 4 amps per circuit (per SAE specifications).
It will have an electrical code of "B" in the paper catalog.
Estimating Trailer Amperage Per Circuit:
Stop-Turn Lights 2 Amps each
Taillights 1 Amp each
Clearance and Marker Lights 1/2 Amp each
Available in a custom or universal fit, towing mirrors increase visibility by allowing the driver to see the end of the trailer.
This makes backing up and passing other vehicles much easier.
Towing a trailer may be one of driving's most stressful situations.
For one thing, it's not easy to maneuver around corners and change lanes with that extra length behind your vehicle.
Backing up also can be challenging. Plus, stopping--and towing up a steep hill--can be tough on your tow vehicle.
Whether you tow a boat, horses, a race car, snowmobiles, motorcycles, dirt bikes or personal watercraft, a variety of custom auto accessories can make towing
less nerve-wracking.
These 16 towing tips should help.
Don't Tow Too Much Weight
Use The Right Hitch & Other Equipment
Line Up The Hitch & Trailer Tongue
Load Your Trailer Properly
Get Some Help Hooking Up
Run The Right Wheels And Tires
Get Rid Of Blind Spots
Make Backing Up Easier
Add More Power
Make Stopping Easier
Avoid Overheating
Keep Your Tow Vehicle Level
Stop Swaying
Tow Safely
Fifth-Wheel & Gooseneck Hitches
Towing A Car Behind A Motor home
Driving
The addition of a trailer adds weight and length to the tow vehicle.
More weight means more time to speed up and more importantly, slow down.
Overall handling is also affected. When towing, allow for extra time when switching lanes, stopping and passing other vehicles.
To assist in slowing down, many people use an electric trailer brake controller.
The extra length can cause problems on turns. Because the trailer does not follow the exact path as the vehicle on turns, remember to swing out wider
when traveling around bends and corners.
To conserve fuel when towing, travel at moderate speeds. Faster speeds increase wind resistance, reduce gas mileage, and place added strain on the vehicle and trailer. When traveling over large hills or down gravel roads, use a lower gear to ease transmission and engine operation. Shifting out of overdrive and into a lower gear may also improve vehicle gas mileage. Transmission coolers also greatly reduce heat buildup.
If for some reason (a gust of wind, a downgrade, a pass by a larger vehicle, etc.) the trailer does begin to sway, the driver needs to assess the situation to determine the proper course of action. Here is a list of Do's and Don'ts to think about.
| DO |
DON'T |
|
|
Also,be extra cautious of potholes and other large bumps. Riding over one can damage the tow vehicle, trailer hitch and/or trailer. When pulling a trailer take your time and be careful.
Also, there is a complete list of definitions.
![[Karl's sled page]](images/winter_home3.gif)